



Most furniture stores treat product photos like catalog shots: clean backgrounds, decent lighting, maybe a lifestyle scene. But conversion data from furniture retailers tells a different story about what actually drives purchases and prevents returns.
The gap between what customers expect and what they receive drives roughly 31% of furniture returns. Not quality issues. Not damage in transit. Expectation mismatches — and most trace back to incomplete photography. Every return costs somewhere around $180–$240 in logistics, restocking, and markdown losses. Meanwhile, stores with comprehensive shot lists consistently see higher conversion rates on first visits.
The operational challenge isn't taking better photos. It's systematizing which photos you need for each product type, staging them consistently, and catching problems before listings go live. After working through photo workflows across dozens of furniture retailers, the difference between high-converting listings and return magnets usually comes down to structured shot lists, mandatory dimensions in every frame, and batch-editing workflows that don't break your visual standards.
Why furniture photos fail: archetype confusion and missing context shots
Furniture photography breaks differently than other retail categories. A sofa photographed like a dining table creates cognitive friction. Customers can't mentally place the item in their space when the visual hierarchy fights their expectations.
Each furniture archetype demands specific shot priorities. Sectionals need overhead layouts showing configuration options. Dining sets require pulled-back shots displaying full extension with leaves. Recliners must show range of motion. Storage pieces need open/closed states with interior organization visible. Yet most stores apply the same 5-photo template across everything: hero, angle, detail, lifestyle, dimension graphic.
The operational mess compounds during seasonal catalog updates. Photography teams shoot 200+ SKUs over a few days, processing everything through the same workflow. By the time someone notices the modular bookshelf system only has standalone unit photos — no configuration examples — the product's been live for weeks, accumulating "not as expected" returns.
Visual consistency breaks at scale without archetype-specific shot lists. Your photographer captures beautiful images, but they're answering the wrong questions. Customers examining an ottoman don't care about wood grain detail shots — they need to see storage capacity, height relative to a standard sofa, and some indication of weight limits.
The staging classification problem makes this worse. Most furniture retailers track "lifestyle" vs "studio" shots, maybe "detail" if they're organized. But effective furniture photography needs more granularity: in-context scale (size relative to humans or common items), functional demonstration (drawers opening, leaves extending), material verification (close-ups under different lighting), assembly state (flat-pack vs assembled), and dimensional proof (measuring tape or grid backgrounds).
Without those structured staging fields in your content management system, photographers make judgment calls. One shoots all bedroom furniture against white. Another stages everything in room vignettes. A third mixes approaches. Your website ends up as a visual garage sale where customers can't develop consistent expectations.
Building archetype-specific shot lists that prevent returns
Effective furniture photography starts with product archetypes, not individual SKUs. Group your catalog into operational categories based on how customers evaluate purchases — not how your warehouse organizes inventory.
Eliminate inventory headaches and order delays.
Hosyly streamlines your furniture orders and stock management for seamless store operations.
- Real-time inventory tracking
- Automated order processing
- Customer notifications & engagement
No credit card required
Seating furniture requires:
-
45-degree hero showing full form
-
Direct front showing width and seat height
-
Profile showing depth and back angle
-
Seat cushion detail (firmness indicators)
-
Leg/base detail (stability indicators)
-
In-context with average-height person (5'6"–5'10")
-
Fabric/material swatches under varied lighting
Storage furniture requires:
-
Closed state hero
-
Fully open showing interior organization
-
Half-open showing mechanism (drawers, doors)
-
Interior dimensions with measuring tape
-
Weight demonstration (books, items inside)
-
Assembly hardware detail (if flat-pack)
-
Surface material under direct light
Tables and surfaces require:
-
Overhead showing full surface area
-
45-degree showing proportions
-
Edge and corner detail
-
Leg configuration from below
-
Extension mechanism (if applicable)
-
Surface styling with place settings (dining)
-
Height verification with standard chair
Sleep furniture requires:
-
Full bed made with standard bedding
-
Bare mattress platform/slats
-
Headboard detail and attachment
-
Under-bed clearance measurement
-
Side rail and support system
-
Corner and edge finishing
-
Scale reference with nightstand
Notice what's missing from standard photo packages: functional demonstrations, scale references, and assembly states. These are the gaps that create returns. Customer orders a platform bed expecting under-bed storage — photo showed a made bed hiding the floor-hugging design. Return. Customer receives a bookshelf expecting adjustable shelves — photos only showed a fixed configuration. Return.
Mandatory dimension fields solve the scale confusion problem. Every archetype needs specific measurements visible in designated shots:
Critical dimensions by archetype:
| Archetype | Must-show dimensions | Placement in frame |
|---|---|---|
| Sofas | Seat height, depth, arm height | Profile and front shots |
| Dining tables | Clearance under table, extension length | Side view and overhead |
| Dressers | Drawer interior depth | Open drawer shot |
| Beds | Mattress platform height, under-bed clearance | Side profile |
| Chairs | Seat width, back height | Front and side |
| Bookcases | Shelf spacing, depth | Straight-on with items |
| Coffee tables | Height from floor, surface area | Side and overhead |
Don't rely on dimension graphics added in post-production. Physical measuring tapes or grid backgrounds in actual photos build trust. Customers spot Photoshopped measurements — they look too perfect, float awkwardly, use inconsistent fonts. A real measuring tape laying on actual furniture surfaces converts better.
Batch-editing workflows that maintain visual standards
Furniture photography generates massive file volumes. A typical seasonal refresh produces 1,400–2,000 raw images across 200 SKUs. Without structured batch workflows, your editing either bottlenecks or fractures — one person processing everything, or multiple editors applying different standards.
The fix requires three layers: automated preprocessing, human verification, and systematic QA. Most furniture retailers only focus on the middle layer — hiring more editors or outsourcing. But preprocessing and QA determine whether batch editing actually holds up.
Preprocessing handles:
-
Background removal and standardization
-
Color correction to match swatches
-
Perspective correction for architectural shots
-
Watermark and logo placement
-
Initial crop to aspect ratios
-
File naming by SKU and shot type
This isn't about AI magic — it's consistent rules. Set white balance targets for each material type. Define crop ratios for each shot type. Establish perspective grid templates for room scenes. When photographers submit images, preprocessing applies these rules before human editors touch anything.
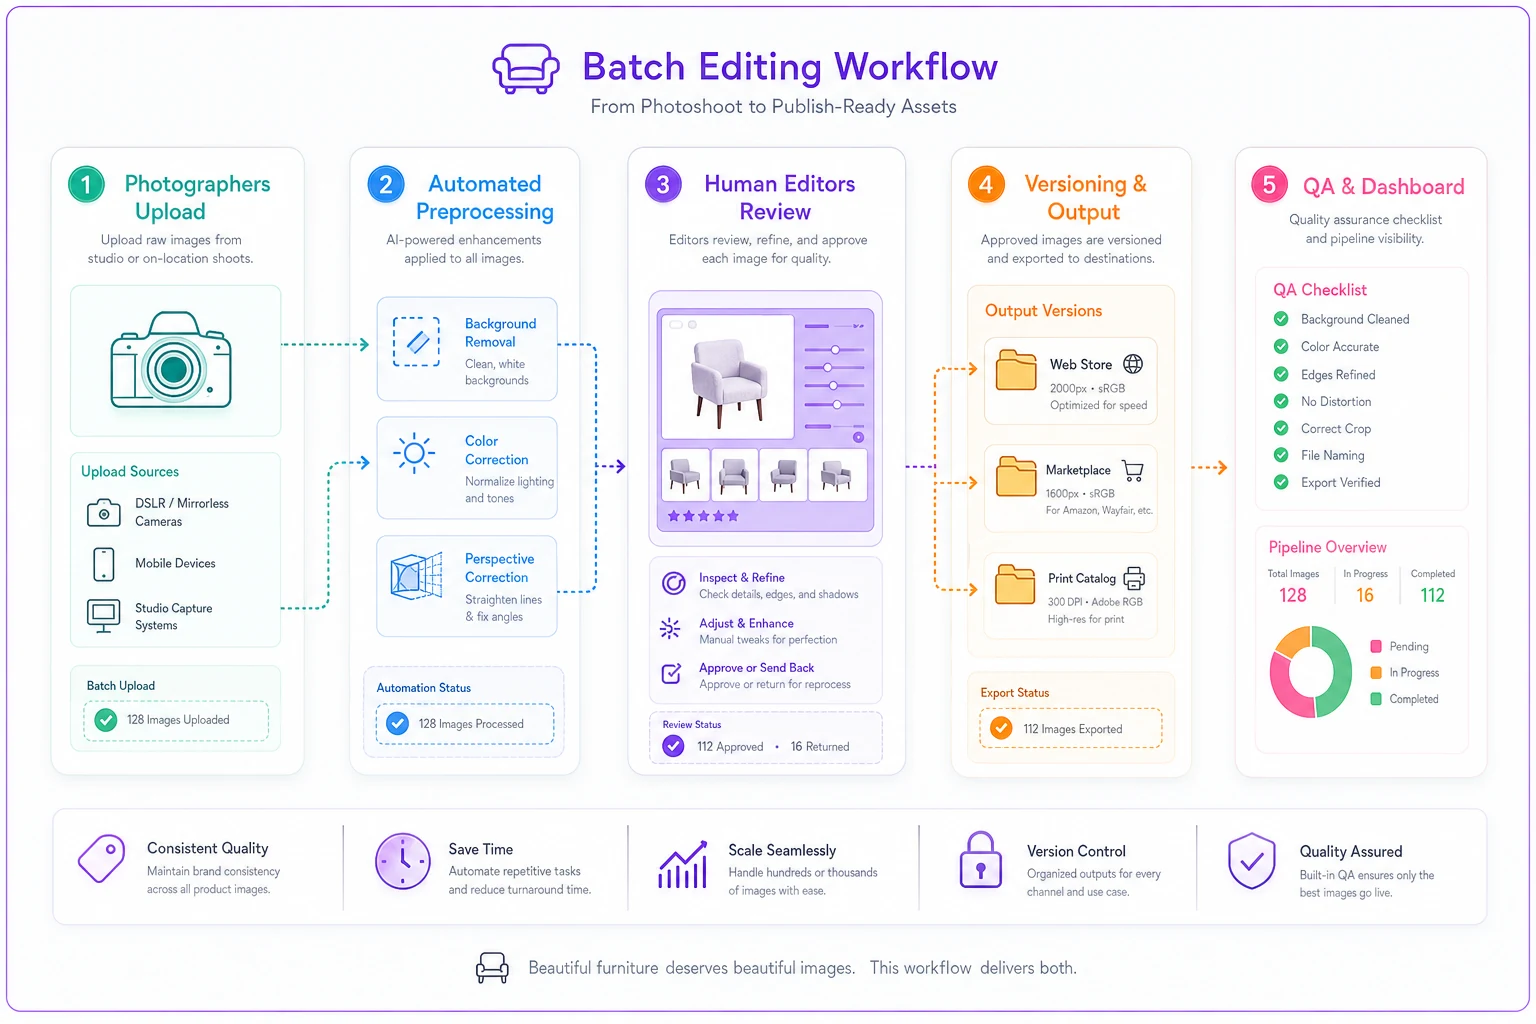
The human editing layer focuses on what automation misses: shadow consistency, fabric texture enhancement, edge refinement around glass and metal, color matching across multi-angle shots, removing distracting elements. Editors work from standardized starting points, not raw files.
The version control problem is where batch workflows actually break down. Original photography for a sectional sofa might include 47 shots. After culling, 12 remain. Editors create 3 versions: website (compressed), marketplace (square crop), print catalog (high-res). That's 36 final files for one product. Multiply by 200 SKUs per season and you have a real organizational problem.
/2024-Fall/ /Raw/ /SKU-12345-Sectional/ 12345-01-hero-raw.cr2 12345-02-front-raw.cr2 /Processed/ /SKU-12345-Sectional/ /Web/ 12345-01-hero-web.jpg /Marketplace/ 12345-01-hero-square.jpg /Print/ 12345-01-hero-print.tif
Version control extends beyond file organization. Each edit pass needs documentation: who edited, what changed, which template applied. When a customer complains the "navy" sofa they received looks black, you need to trace whether the color shift happened in photography, editing, or display calibration.
Content QA checklist before listings go live
Photography QA in furniture retail usually means "do the photos look good?" That's necessary but not sufficient. Your QA checklist needs operational checks that catch conversion killers and return triggers before products go live.
Technical quality checks:
-
Resolution meets platform requirements (typically 2000x2000 minimum)
-
File sizes under marketplace limits
-
Color profile consistent (sRGB for web)
-
No visible editing artifacts
-
Background truly white (#FFFFFF) or transparent
-
Product fills 85–90% of frame
Archetype compliance checks:
-
All required shots present per archetype list
-
Dimensional shots include measuring references
-
Scale references use consistent objects
-
Functional states shown (open/closed, extended/compact)
-
Assembly states documented if applicable
Consistency checks across variants:
-
Same angle and lighting for color variants
-
Identical staging for size variants
-
Matching backgrounds across related SKUs
-
Consistent prop styling within collections
Metadata and tagging checks:
-
Alt text describes actual product (not generic)
-
File names follow SKU convention
-
Shot type tags applied correctly
-
Lifestyle vs studio tags accurate
-
Material and color tags match swatches
The QA process breaks when treated as a gate rather than a feedback loop. Most retailers run QA after batch editing completes — too late to fix systematic issues without expensive rework.
Effective QA happens at three checkpoints:
-
Post-shoot review (same day)
Verify shot list completion, check technical basics, flag missing angles before teardown
-
Post-edit sampling (per batch)
Review 10% of edited images, catch systematic editing issues early
-
Pre-publish audit (per SKU)
Complete checklist verification, comparison against live site standards
Sample 10% of edited images per batch to detect recurring editing issues early and avoid reprocessing large volumes.
The sampling approach prevents bottlenecks while catching real problems. If your editor consistently over-sharpens fabric textures, you'll spot it in the 10% sample — not after processing 200 products. If your photographer misses overhead shots for dining tables, you'll catch it before they leave the studio.
Connecting photo problems to business metrics
Photography touches four metrics that furniture retailers actually track: conversion rate, return rate, average order value, and customer service tickets. Yet most stores never connect photo decisions to these outcomes.
Start with return reasons. Tag every return with a specific expectation gap: size misconception, color mismatch, quality perception, functionality misunderstanding, assembly surprise. After 90 days, patterns surface. Ottoman returns cluster around "smaller than expected" — your photos lack human scale reference. Dining chair returns cite "uncomfortable" — photos don't show seat depth or back angle clearly.
Conversion tracking requires more analysis than most retailers bother with. Set up heatmaps on product pages. Where do visitors click? How long do they spend on each image? Which photos correlate with add-to-cart? That beautiful lifestyle shot might get engagement, but the boring dimension shot drives purchases.
A furniture retailer ran this analysis across their catalog and found that their highest-converting products all shared one trait: overhead shots for anything with a surface — tables, desks, ottomans. They added overhead shots to 100+ SKUs. Conversion jumped 14% on those products within 60 days. No price changes, no new marketing.
Service tickets reveal photo gaps through repetitive customer questions. "What's the actual color?" means your photos don't show materials under varied lighting. "Will this fit through my door?" means you're not showing dimensional breakdowns. "How hard is assembly?" means you're avoiding the flat-pack reality. Every question that comes up repeatedly represents a missing photo.
The forecasting work for slow-moving SKUs also gets more accurate when photos set correct expectations. High-ticket items with comprehensive photography see steadier demand patterns — fewer peaks from misled customers, fewer valleys from return waves.
Poor photography also compounds inventory challenges in ways that aren't obvious. It drives impulse purchases that turn into returns. Those returns arrive at your warehouse damaged or incomplete. Now you're holding depreciated inventory that needs remarketing with — ironically — better photography to move it.
The real cost of fixing furniture photography workflows
Overhauling photography workflows sounds expensive until you run the numbers on what poor workflows are costing you. Returns from expectation mismatches run $180–240 per incident. Customer service tickets about product details cost $12–18 per interaction. Lost sales from poor conversion are harder to quantify but typically dwarf both.
The investment breaks into three categories:
Shot list development (one-time): Map every product archetype, define required shots, document staging standards. Takes 40–60 hours for a typical furniture catalog. Prevents significant rework and confusion later.
Photography expansion (per shoot): Adding comprehensive shot lists increases studio time by 35–50%. A SKU that took 20 minutes now takes 28–30. But batch efficiency improves when photographers follow consistent lists rather than making creative decisions on the fly.
Workflow systemization (ongoing): Preprocessing automation, QA checkpoints, and metadata management require initial setup then minimal maintenance. Most furniture retailers can implement basic automation with existing tools — Photoshop actions, Lightroom presets, folder watching scripts.
The real operational efficiency comes from eliminating decision fatigue. When every product follows archetype-specific shot lists, photographers stop wondering what angles to capture. When editors work from preprocessed files, they stop debating color correction approaches. When QA follows structured checklists, they stop relying on subjective judgment.
During peak season, this compounds fast. Your photography team needs to shoot 400 new SKUs for spring catalog. Without structured workflows, that's 400 individual decisions about shot lists, staging, and editing standards. With archetype-based systems, it's applying 8–10 templates across product groups.
Making photography ops sustainable with the right platform
Photo workflow improvements stick when they're embedded in systems, not dependent on individual expertise. The photographer who memorized all your shot lists will eventually leave. The editor who maintains quality standards through experience will get promoted. The QA person who catches every issue needs vacation.
This is where AI-powered operational software changes the dynamic — shifting photo workflows from people-dependent to process-driven. Instead of hoping photographers remember which shots each archetype needs, your platform prompts them through structured checklists. Rather than editors guessing at color standards, automation applies consistent corrections. Instead of QA manually checking every requirement, the system flags missing shots before publishing.
The compound effect shows during seasonal transitions. Spring catalog prep that took 6 weeks shrinks to 4 — not because people work faster, but because decisions become automatic. Photographer sees "dining table" category, system loads the shot requirement list. Editor uploads batch, preprocessing handles the tedious work. QA reviews a dashboard showing completion percentages, not individual files.
AI automation particularly helps with the work that burns out creative teams. Background removal across 2,000 images. Perspective correction for room scenes. File renaming by SKU convention. Color matching across variants. These aren't creative decisions — they're operational necessities that software handles more consistently than tired people.
The integration between photography workflows and broader operations is where you get unexpected value. When photos upload with correct metadata, your inventory system automatically updates. When dimensional shots meet requirements, your shipping calculator provides accurate quotes. When lifestyle scenes include scale references, your customer service team fields fewer size questions.
The sustainable part is the feedback loop. Every return tagged with "photo mismatch" feeds back to shot list requirements. Every customer question about product details identifies a missing angle. Every conversion test reveals which photos actually drive sales. Your platform evolves with your business rather than calcifying around standards you set three years ago.
Moving beyond catalog thinking
Furniture photography isn't about pretty pictures — it's about operational discipline that drives sales and prevents returns. The stores winning on conversion and margins don't have better photographers. They have better systems that ensure every product gets the shots customers need to make confident purchases.
Your furniture product photography checklist should start with archetypal requirements, not artistic vision. Build shot lists that answer customer questions before they ask. Implement batch workflows that maintain standards at scale. Create QA processes that catch problems before they become returns.
The investment in structured photography operations pays through reduced returns, higher conversion, and lower service costs. Every expectation mismatch you prevent saves around $200 in logistics and remarketing. Every question you answer through photos saves a service interaction. Every confidence boost you provide through comprehensive imagery drives average order values higher.
Stop treating product photography as a creative exercise. It's an operational discipline — and your margins will reflect that distinction.
Furniture photography isn't about pretty pictures — it's about operational discipline that drives sales and prevents returns. The stores winning on conversion and margins don't have better photographers. They have better systems that ensure every product gets the shots customers need to make confident purchases.
Your furniture product photography checklist should start with archetypal requirements, not artistic vision. Build shot lists that answer customer questions before they ask. Implement batch workflows that maintain standards at scale. Create QA processes that catch problems before they become returns.
Ready to elevate your furniture business?
Join 500+ furniture retailers using Hosyly to increase efficiency, improve customer satisfaction, and grow revenue.