


A sectional shows up with a two-inch gouge on the chaise arm. The delivery crew is already gone. The customer texts a blurry photo four days later, mad. Now you're stuck: was it the carrier's fault, the packaging, the installer, or already there when it left your dock? Nobody wrote anything down. The carrier's claim window is 60 days from delivery and you've already burned five of them arguing internally about whose problem this is.
That's the whole game with furniture damage claims. It's rarely lost because the damage wasn't real. It's lost because the evidence was weak, late, or pointing at the wrong party. Carriers and freight brokers deny claims for the smallest paperwork gaps, and most furniture stores hand them the excuse for free.
This is a workflow problem, not a bad-luck problem. Below is the actual system — triage, photo templates, escalation scripts, and a compensation matrix — tuned specifically to how furniture gets damaged between the supplier's dock and the customer's living room.
The three moments where evidence gets created (or lost)
Furniture damage doesn't happen at one point. It happens across a handoff chain, and each handoff is a chance to prove or lose fault. If you don't have evidence at all three moments, you're guessing:
-
Dock-in from supplier — did it arrive damaged from the vendor?
-
Warehouse hold / staging — did your own team ding it in the racks?
-
Transit + installation to customer — did the delivery crew or LTL carrier cause it?
Stores tend to obsess over the third moment because customer complaints are loud, and mostly ignore the first two. Then when damage gets reported, there's no baseline. They can't prove the piece left the warehouse clean, so they eat the cost instead of pushing it back to the vendor or carrier.
The fix starts with one rule: every piece gets photographed at every handoff, no exceptions, and the photos are timestamped and tied to the order. That single discipline decides more claims than any script you'll ever write.
Triage: sort the damage before you touch a claim
Not every ding is a claim. Some are cosmetic and cheaper to touch up than to fight. Some are structural and non-negotiable. Triage first, because the wrong response wastes labor and annoys customers who just wanted a quick fix.
Eliminate inventory headaches and order delays.
Hosyly streamlines your furniture orders and stock management for seamless store operations.
- Real-time inventory tracking
- Automated order processing
- Customer notifications & engagement
No credit card required
A simple triage frame the receiving team and delivery crews can run in under two minutes:
-
Tier 1 — Cosmetic, touch-up eligible
surface scuffs, minor fabric marks, small finish scratches. Fixable on-site or with a spare-parts kit. Usually not worth a carrier claim.
-
Tier 2 — Functional but repairable
drawer glide bent, loose leg, cracked trim, torn seam. Needs a tech visit or part swap. Claim it if fault is external.
-
Tier 3 — Structural / non-repairable
cracked frame, split panel, broken mechanism, water damage. Replacement territory. Always claim.
-
Tier 4 — Concealed damage
looks fine outside, damaged inside the packaging. This is the tricky one, because carriers assume you caused it after delivery.
Concealed damage deserves its own attention. Most freight carriers require concealed-damage reports within a tight window — often 5 business days, sometimes less — and they'll fight you hard because they can't inspect packaging that's already in a dumpster. The operational rule: do not discard packaging on high-value pieces until the item is fully inspected and signed off. Sounds obvious. Almost nobody does it consistently.
Do not discard packaging on high-value pieces until the item is fully inspected and signed off.
The operational rule: do not discard packaging on high-value pieces until the item is fully inspected and signed off. Sounds obvious. Almost nobody does it consistently.
The photo-evidence template that actually holds up
Blurry, undated, context-free photos are why claims die. A photo of a scratch means nothing to an adjuster if they can't tell what item it is, when it was taken, or whether it's your warehouse or the customer's floor.
Every damage photo set should include the same five shots, in this order:
-
Wide shot — the full piece, so the adjuster can identify the item and see there's no other visible damage being hidden.
-
Mid shot — the damaged zone in context (the arm, the corner, the drawer front).
-
Close-up with scale — the damage with a tape measure or coin next to it for size reference.
-
Packaging shot — the box, pallet, corner protectors, and any crush marks or punctures. This is the one that wins carrier claims.
-
Label + BOL shot — the shipping label, freight bill, and any "damaged on arrival" notation, photographed together.
Add a sixth for installation damage: a photo of the delivery paperwork signed with the damage noted before the crew leaves. A signature that says "received in good condition" is a claim-killer. If the customer signs clean and reports damage later, you've handed the carrier their defense.
| Evidence element | Weak (claim likely denied) | Strong (claim likely paid) |
|---|---|---|
| Timing | Photo taken 4 days after delivery | Photo timestamped at delivery |
| Item ID | Cropped shot, no context | Wide shot ties damage to specific SKU/order |
| Packaging | Already thrown out | Photographed showing crush/puncture |
| Delivery receipt | Signed "good condition" | Damage noted and initialed on BOL |
| Scale | No size reference | Tape measure in frame |
| Chain of custody | No dock-in photo | Clean dock-in photo proves external fault |
The right-hand column isn't more work once it's a habit. It's the same six photos every time. The problem is consistency, not effort — and that's exactly the kind of repetitive step where a workflow platform with a mobile checklist earns its keep, since it can require the photos before a delivery is marked complete and auto-attach them to the order record. The photos matter more than the tool, but the tool keeps the habit from breaking on a busy Friday.
Carrier escalation scripts: what to say and when
Most stores lose claims in the back-and-forth. The carrier asks for one more document, you take a week to respond, the window closes, denial stands. Escalation is a timeline, not a single email.
Step 1 — File within 48 hours (initial notice). Keep it factual. Reference the BOL number, delivery date, item, and attach the photo set.
> "Filing a damage claim for [BOL#], delivered [date]. Item: [SKU/description]. Damage noted on delivery receipt (attached). Photo evidence and packaging documentation attached. Requesting claim number and adjuster assignment. Please confirm receipt."
Step 2 — Confirm receipt and log the clock (day 3). Carriers "lose" claims constantly. Get a claim number in writing. If you don't have one within 72 hours, resend and CC your account rep.
Step 3 — Respond to information requests same-day. Adjusters use delay as a filter. If they ask for the packaging photo or invoice value, send it that day. Every day you sit on a request is a day they'll cite as your lack of cooperation.
Step 4 — Escalate on denial or silence (day 14–21).
> "The denial cites [reason]. Attached evidence directly addresses this: dock-in photo dated [X] shows the item left our facility undamaged, and packaging photos show [crush/puncture] consistent with transit handling. We're requesting formal reconsideration and, if unresolved within 10 business days, will escalate to [freight broker / claims arbitration / your account manager's supervisor]."
Step 5 — Freight broker or account leverage. If you route volume through a broker or 3PL, they have leverage you don't. Loop them in early on anything over a few hundred dollars. A broker moving weekly loads gets calls returned that a single store never will.
One pattern worth naming: carriers pay faster when they see you're organized. A clean, numbered, evidence-backed claim signals you'll pursue it. A messy one signals you'll give up. Adjusters triage by effort just like you do.
The customer compensation matrix
While the carrier fight plays out — and it can take weeks — the customer is sitting in your showroom's reputation. You can't make them wait on the carrier's timeline. You need a decision matrix that separates what you owe the customer from what you'll recover from the carrier. These are two different clocks.
| Scenario | Customer resolution | Recovery path | Owner |
|---|---|---|---|
| Tier 1 cosmetic, customer accepts | On-site touch-up + small goodwill credit (~5–10%) | Usually absorbed | Delivery crew |
| Tier 2 repairable, external fault | Schedule tech within 5 days, loaner if needed | Carrier or vendor claim | Service lead |
| Tier 3 structural, in stock | Replace within delivery cycle | Full carrier/vendor claim | Ops manager |
| Tier 3 structural, out of stock | Replace + interim credit or rental piece | Full claim + expedite | Ops manager |
| Tier 4 concealed | Inspect, replace or repair by tier | Concealed-damage claim (tight window!) | Ops + receiving |
| Repeat damage, same order | Full replacement + escalated goodwill | Root-cause review with vendor | Store owner |
The insight most stores miss: decouple customer compensation from claim recovery. If you make the customer wait until the carrier pays, you lose the customer to protect a claim that might net you a few hundred dollars. Resolve the customer fast, then pursue recovery on your own timeline. The two shouldn't touch.
The goodwill credit piece matters too. A small, immediate credit on a Tier 1 ding usually costs less than the labor to dispatch a tech, and it dramatically outperforms a drawn-out repair on customer satisfaction. Know your break-even before the crew is standing in the living room.
A real scenario
A mid-size furniture store — two showrooms, mostly LTL freight from three suppliers, roughly 40–50 deliveries a week — was writing off close to $2,500–$3,000 a month in transit and installation damage. Their carrier claim approval rate sat around 30%. The rest got denied on "no damage noted at delivery" or "unable to verify condition at pickup."
-
Required a dock-in photo set on every high-value inbound piece.
-
Required delivery crews to photograph and note damage on the receipt before leaving, and stopped letting customers sign a clean receipt on a damaged item.
-
Started filing within 48 hours with the standard six-photo set and a claim number logged.
Within about four months their approval rate climbed to somewhere in the 65–70% range. The write-off didn't disappear — some damage is genuinely absorbed cost — but it dropped to under $1,200 most months. The quieter win: fewer customer disputes, because damage got caught and resolved at the door instead of dragging into a week-long argument.
Nothing there is clever. It's the same six photos and the same 48-hour clock, run consistently.
When to fight a claim and when to just eat it
Not every claim is worth the labor. Chasing a $90 cosmetic touch-up through a 30-day carrier escalation costs more in staff time than the damage itself. A rough rule:
-
Fight it when the recoverable value clears your threshold (many stores land around $150–$200), the fault is externally provable, and you have the photo chain.
-
Absorb it when it's Tier 1 cosmetic, the labor to pursue exceeds the recovery, or your evidence has a gap you can't close.
-
Root-cause it, don't just claim it when the same SKU or same lane keeps getting damaged. That's a packaging or handoff problem, and it's worth fixing at the source rather than filing the same claim monthly. If it traces back to how pieces arrive from the supplier, the real fix lives upstream in the supplier, transit, and assembly handoffs — not in the claim.
Stores that get this wrong file everything with equal energy and burn their team out on tiny claims, or they absorb everything and quietly bleed margin. The matrix above exists so the decision gets made by policy, not by whoever's having a bad day.
Where a workflow platform actually helps
The reason damage claims fail is almost never a lack of good intentions. It's that the six-photo discipline, the 48-hour filing, and the chain-of-custody photos all depend on a tired crew remembering steps at the end of a long delivery day. Under pressure, steps get skipped. That's human, and no amount of "try harder" fixes it.
This is where an operational platform earns its place. A delivery can't be closed until the required photos are attached. Concealed-damage windows trigger reminders before they lapse. Claims get a status and an owner so nothing sits in someone's inbox until the window dies. The photos auto-attach to the order, so when an adjuster asks for the dock-in shot from three weeks ago, it's one click instead of an hour of digging through phones.
Here's a simple workflow diagram that shows the required photo steps, claim filing clock, and escalation path enforced by a delivery platform.
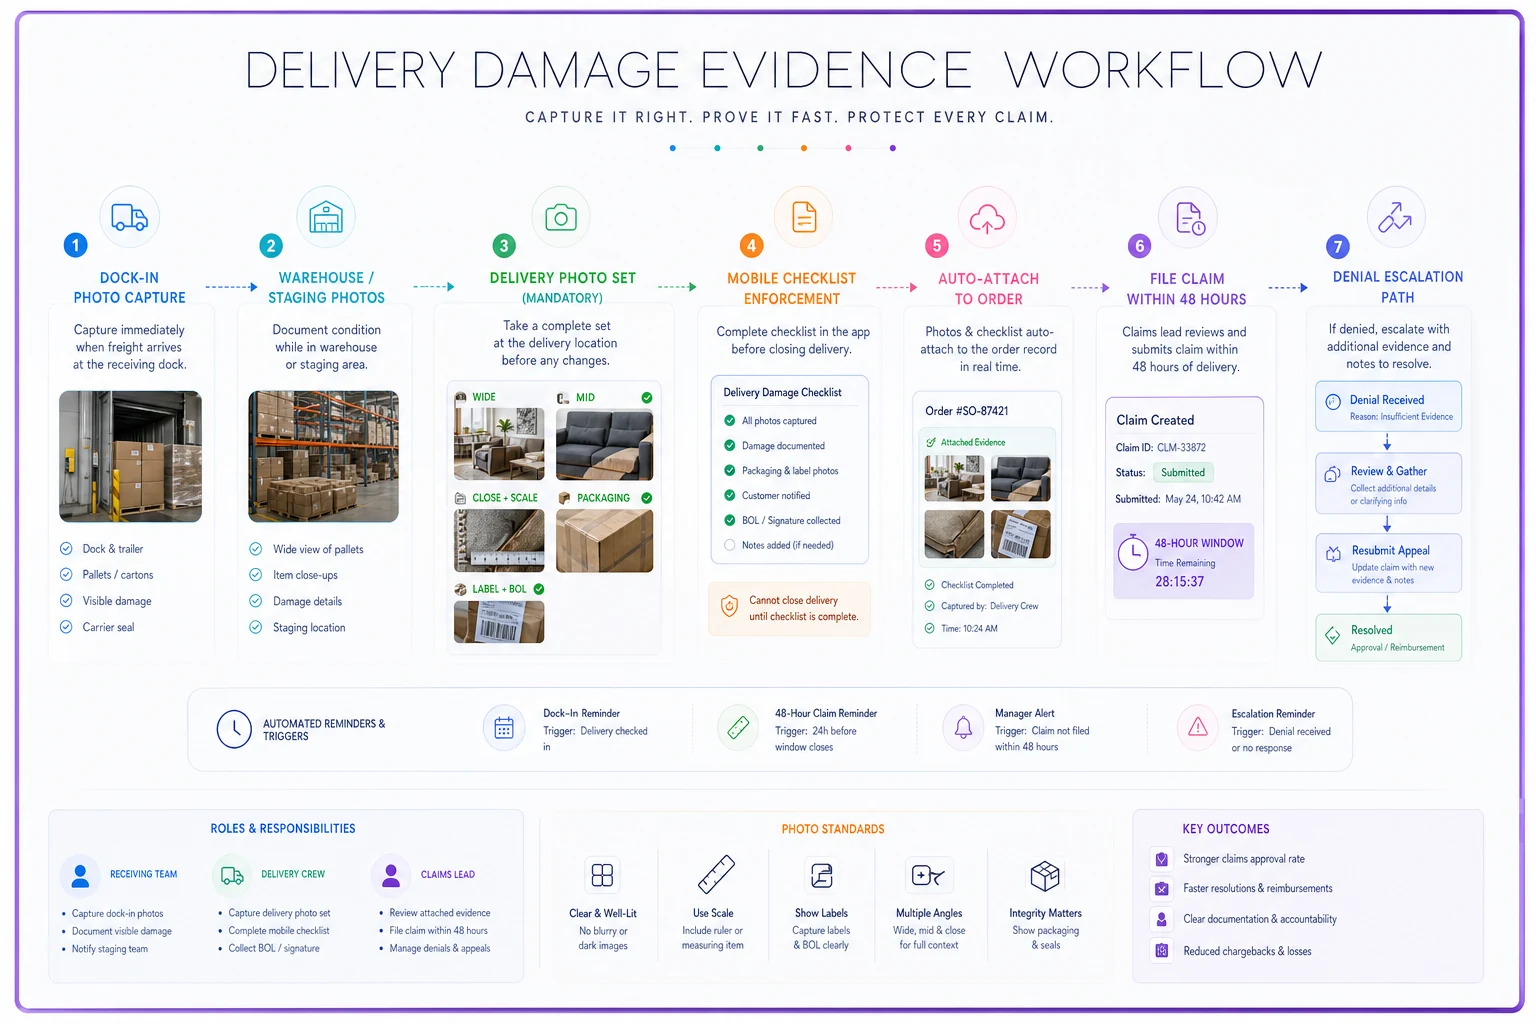
None of that replaces the workflow — it just enforces the parts people forget. The evidence discipline is what wins claims. The software mostly keeps that discipline from breaking on busy days.
Start with the handoffs, not the claims
Your claim outcomes are decided long before you file. They're decided at the dock, at the staging rack, and at the customer's door — in whether someone took the photo and noted the damage on the receipt. The carrier scripts and compensation matrix are downstream of that.
Build the photo habit at every handoff. Decouple what you owe the customer from what you'll recover. File fast, log the claim number, and respond to adjusters the same day.
Do that consistently and your approval rate climbs on its own — not because you got better at arguing, but because you stopped handing carriers a reason to say no.
Ready to elevate your furniture business?
Join 500+ furniture retailers using Hosyly to increase efficiency, improve customer satisfaction, and grow revenue.